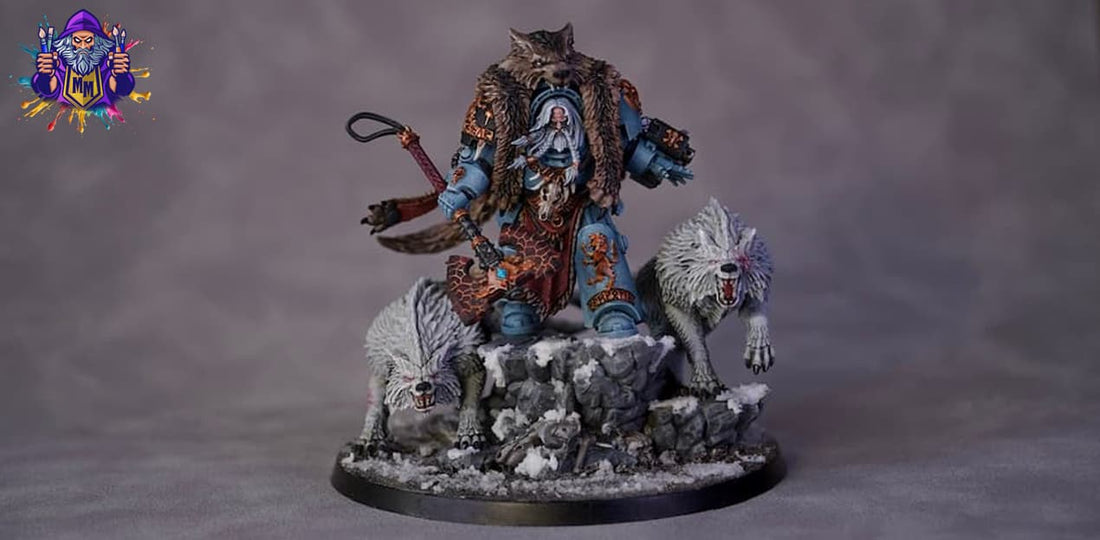
In this in-depth tutorial, our studio painter tackles Logan Grimnar, the legendary Chapter Master of the Space Wolves, capturing his cold, battle-hardened presence in miniature form. From the cool grey armour accented with icy blue highlights to the aged gold of his ornate wargear, every detail is brought to life with precision and character.
You’ll see how to achieve lifelike wolf pelts, natural leather and bone textures, and glowing eyes that draw the viewer’s gaze instantly. The process also covers refined techniques for painting fur, skin tones, claws, and metallics – giving Logan and his wolves the gritty realism worthy of a hero of the Vlka Fenryka.
Contents
- Full painting video
- Paints list
- Step by step guide
- Finished result
Full Video
Paints used
Paints used
- Wolf Grey (Two Thin Coats)
- Fenrisian Grey (Citadel Layer)
- Blue Horror (Citadel Layer)
- Gryph-Charger Grey (Citadel Contrast)
- Space Wolves Grey(Citadel Contrast)
- Retributor Armour (Citadel Base)
- Reikland Fleshshade (Citadel Shade)
- Ratling Grime (Citadel Contrast)
- Griffin Claw (Two Thin Coats)
- Tuskgor Fur (Citadel Layer)
- Black Legion (Citadel Contrast)
- Cygor Brown (Citadel Contrast)
- Agrax Earthshade (Citadel Shade)
- Grey Seer (Citadel Base)
- Soulblight Grey (Citadel Contrast)
- Bugman's Glow (Citadel Base)
- Cadian Fleshtone (Citadel Layer)
- Frostheart (Citadel Contrast)
- Wraithbone (Citadel Base)
- Skeleton Horde (Citadel Contrast)
- Contrast medium (Citadel Technical)
- Gunmetal (Vallejo Mecha Colour)
Step by step guide
Painting the Armour
You're aiming for a striking look with cool grey tones and a vibrant blue highlight! Here's how to achieve it:
Base Coats
- Wolf Grey (Two Thin Coats): Begin by applying two thin, even coats of Too Thin Coats Wolf Grey to all areas of the armour. This provides a solid and consistent foundation.
Texture and Highlights
- Fenrisian Grey & Blue Horror (Stippling & Sponging): Once the Wolf Grey is dry, use a combination of stippling and sponges to apply Fenrisian Grey. This will create a textured, mottled effect. Follow this with a lighter application of Blue Horror using the same techniques, focusing on areas you want to highlight further.
Recess Shading
- Gryph-Charger Grey & Space Wolves Grey Contrast Mix: For the recesses of the armour, prepare a custom wash. Mix Gryph-Charger Grey and Space Wolves Grey contrast paints with a contrast medium. Apply this mixture carefully into the panel lines and any other recessed areas to add depth and definition.
Final Edge Highlight
- Blue Horror (Edge Highlight): To complete the armour, meticulously edge highlight all the raised edges and sharp corners with Blue Horror. This final step will make the armour pop and define its shape.
This process should give your armour a distinctive and well-defined finish!

Painting the Gold on the Armour
You're going for a rich, deep gold, and these steps will help you achieve it:
Base Coat
- Retributor Armour: Start by applying a solid base coat of Retributor Armour to all the gold areas. Ensure an even application for a smooth foundation
Shading and Definition
- Reikland Fleshshade (Thin Coat): Once the Retributor Armour is dry, apply a thin coat of Reikland Fleshshade. This will add warmth and initial shading to the gold.
- Thinned Ratling Grime Contrast: While the Reikland Fleshshade is still wet (or
immediately after it dries, depending on your preference for blending), apply thinned-down Ratling Grime contrast paint. Focus this specifically on the deeper parts of the armour, such as sculpted details or text, to enhance definition and create a sense of age or grime in those recesses.
This process will give your gold a beautiful, nuanced finish with excellent depth!

Painting the Wolf Pelt and Claws
You're creating a dynamic and realistic wolf pelt! Here's the step-by-step guide:
The Fur (Outer Pelt)
- Basecoat: Begin by applying a basecoat of Griffin Grey by Too Thin Coats to the entire fur area of the wolf pelt.
- All-over Wash: Once the basecoat is dry, apply a thinned-down Ratling Grime Contrast Paint over all of the fur. This will settle into the recesses, adding depth and shadow.
- Drybrush: After the Ratling Grime has dried, drybrush the fur with Griffin Grey (the
original basecoat colour). This will pick out the raised textures and restore highlights. - Pattern Definition: To further define the fur pattern, use Ratling Grime straight from the pot (undiluted) and carefully paint individual strokes or lines following the natural flow of the fur. This will create deeper shadows and sharper texture
The Inner Pelt
- Basecoat: For the inside of the pelt, apply a basecoat of Tuskgor Fur.
- Wash: Once the Tuskgor Fur is dry, apply Reikland Fleshshade over the entire inner pelt to add warmth and shading.
- Highlight: After the wash has dried, highlight the raised areas of the inner pelt by
drybrushing or carefully painting with the original Tuskgor Fur paint.
The Claws
- Basecoat: For the claws on the pelt, simply apply black paint.
This comprehensive approach will give your wolf pelt a detailed and realistic appearance
Painting Minor Details
For those smaller details that don't need to steal the show, a simple yet effective approach using base coats, washes, and highlights will work perfectly. This method ensures they're well-defined without being overly distracting.
Leather and Similar Elements
For leather straps, pouches, or any other elements you want to represent as leather, use Cygor Brown as your base coat. Apply it evenly, and once dry, apply a wash of Agrax Earthshade to add depth and shading. Finish by highlighting with the original Cygor Brown, picking out the raised edges and textures.
Skulls, Teeth, and Bones
For details like skulls, teeth, or bone ornaments, start with a base coat of Grey Seer. Once this is dry, apply Agrax Earthshade as a wash to define the recesses and add an aged, grimy look. Finally, highlight with Grey Seer again, focusing on the prominent areas to make them stand out subtly.
Black Details
For any small black details that need to be simple and stark, a single coat of Black Legion contrast paint will suffice. Its self-shading properties will give you a clean, deep black with minimal effort.


Painting Logan's Face and Hair
You're aiming for a striking contrast between his hair and glowing eyes, with a naturally highlighted skin tone.
Hair
- Basecoat: Begin by applying an even basecoat of Grey Seer to all of Logan's hair.
- Wash: Once the Grey Seer is dry, apply a wash of Soulblight Grey Contrast Paint over the entire hair area. This will settle into the recesses, adding shadow and definition.
- Highlights: After the wash has dried, progressively highlight the hair:
- First, drybrush or carefully highlight with Grey Seer, focusing on the raised areas.
- Then, for a final, sharp highlight, pick out the very brightest points and individual strands with White.
Face / Skin Tones
- Basecoat: Apply an even basecoat of Bugman's Glow to all of Logan's skin areas.
- Layering for Brightness: This is where you'll build up the natural highlights:
- Prepare a thinned paint mix of Bugman's Glow with a small amount of Cadian
Fleshtone. - Apply this mix to the raised areas of the face (e.g., cheekbones, brow, nose, chin).
- With each subsequent layer (aiming for three to four thin coats in total), gradually increase the proportion of Cadian Fleshtone in your mix, focusing on smaller, more prominent raised areas. This slow build-up of brightness will create a smooth transition and realistic highlights.
- Prepare a thinned paint mix of Bugman's Glow with a small amount of Cadian
Eyes
- Basecoat: Carefully paint the entire eye area with White. This provides a bright base for the glow effect.
- Glowing Blue Effect: While the white is still wet (or immediately after it dries, depending on the desired blending), apply Frostheart Contrast Paint over the white. The contrast paint will flow into the recesses, leaving the raised areas brighter, creating the illusion of glowing blue eyes.
This method will give Logan a very characterful and visually engaging face!

Painting Logan's Wolves
You're taking a straightforward yet effective approach to painting Logan's wolves, focusing on a creamy, bone-like fur with sharp detail work. Here's a breakdown of the process:
Fur and Base Tone
- Wraithbone Base (Heavy Drybrush/Overbrush): Begin by heavily drybrushing or
overbrushing the entire fur area of the wolves with Wraithbone. This establishes the primary light tone for the fur. - Creamy Tint Wash: Once the Wraithbone is dry, prepare a wash by mixing Skeleton
Horde contrast paint with contrast medium at a 70:30 ratio (30% Skeleton Horde, 70% contrast medium). Apply this mixture generously over all the fur. This will settle into the recesses, giving the fur a subtle, creamy tint and adding depth.
Detailing
While the fur wash is drying (or once dry, depending on your preference), you can start on the details:
- Gums: Paint the gums of the wolves with Tuskgor Fur.
- Teeth: Pick out the individual teeth with Grey Seer.
- Claws: Apply Black Legion contrast paint to the claws for a deep, self-shading black.
- Mechanical Aspects: Any mechanical parts on the wolves should be painted with silver.
Final Fur Highlights
- Wraithbone Drybrush: After the Skeleton Horde wash has completely dried, lightly
drybrush the fur again with Wraithbone. This will bring out the raised textures and
reinforce the bone-like appearance. - White Drybrush (Light): For the final touch, apply a very light drybrush of white over the highest points of the fur. This will add crisp highlights and make the fur pop.
This method will give Logan's wolves a distinctive and unified look, ready to accompany him into battle!

Finished Result